
Please, feel free to add me as a contact to your profiles!
 |
| presentation |
 |
| documentation |
 |
| creation |
 |
| automation |
 |
| bim after dark live |
Sunday, May 31, 2009
Labels:
linked in,
linkedin
0
comments
I finally got around to create a LinkedIn.com profile.
Friday, May 29, 2009
BIM Interviews.
Labels:
autodesk BIM,
BIM,
interviews,
Owings and Merrill’s,
Skidmore,
SOM
0
comments
Two great interviews/articles with some audio clips about SOM (Skidmore, Owings and Merrill’s) using BIM in professional practice...
From Architect Magazine:
...Documents for 1 WTC were completed in 2007, and now BIM is used on 85 percent of all SOM projects. Integrated modeling changed how the firm works, but, according to Paul Seletsky, senior manager of digital design in the New York office, adopting BIM requires adopting "BIM culture"—a new way of thinking about building design based on performance, not just form. It also requires a different kind of practitioner, one who can shape-shift between the design and technical demands of any project. Digital Design Specialists, as they are called in SOM parlance, reside on several project teams at a time. They are architects (not "operators," Seletsky stresses) who know the tools: Revit, Digital Project, Rhino 3D, Ecotech, and a host of simulation software. Most important, they can think critically and holistically about a design...Read More....
From Architectural Record:
Carl Galioto, Skidmore, Owings & Merrill’s partner-in-charge of the firm’s New York Technical Group, and Paul Seletsky, SOM’s director of digital design, are two of the architecture profession’s leading experts on BIM: building information modeling (also commonly referred to as virtual design and construction).
The pair discuss how BIM facilitated a major redesign of the Freedom Tower; assess the technology’s strategic impact on the profession; address common misperceptions; explain BIM’s potential benefits for smaller practices; point out how BIM can lead to increased compensation for architects; and lay out the potential ramifications of BIM—both positive and negative—on the architect’s overall role in the realization of buildings (“I believe this moment is a very critical hinge in the history of the practice of architecture—and that architects do have the ability to take a much greater responsibility in the implementation of their designs”)... Read More...
Audio Clips:
Thursday, May 28, 2009
Post-Graduate Tools to Survive.
Interesting article over at AIAS.org (American Institute of Architecture Students).
Despite the economic stimulus programs proposed by local, state and national governments, it may take few years before the AEC professions (architecture, engineering and construction) experience a substantial recovery and before we find professional offices staffed at previous levels. While no one can guarantee a job as an architectural intern or any other related occupations, there are numerous things you can do to lessen the amount of time you are unemployed or underemployed.
In the short run, you may be forced to take a job that is not ideal or one that does not include working directly in an architecture firm. No matter the course you take, it is critical to remain connected to the architecture profession. It is important to maintain your skills and knowledge so that you are fully employable in the future.
Keep in mind that there are numerous "alternative" professions in which you can be successful with an architecture degree.... Read More...
Despite some recent positive news about the economy, it is expected that the economic recession will last until the end of this year and perhaps into 2010 and beyond. Some economists believe that the unemployment rate will continue to rise and will not begin to decline until the end of 2011. The situation is most dire for recent college architecture graduates. It is common knowledge that employment in firms is generally not presently available and is a condition which could remain for some time. While it is true that some companies are hiring there are not enough opportunities for the thousands of graduates seeking jobs.
Despite the economic stimulus programs proposed by local, state and national governments, it may take few years before the AEC professions (architecture, engineering and construction) experience a substantial recovery and before we find professional offices staffed at previous levels. While no one can guarantee a job as an architectural intern or any other related occupations, there are numerous things you can do to lessen the amount of time you are unemployed or underemployed.
In the short run, you may be forced to take a job that is not ideal or one that does not include working directly in an architecture firm. No matter the course you take, it is critical to remain connected to the architecture profession. It is important to maintain your skills and knowledge so that you are fully employable in the future.
Keep in mind that there are numerous "alternative" professions in which you can be successful with an architecture degree.... Read More...
Wednesday, May 27, 2009
The Fountainhead - The Simpson's Edition
Most of you, I am sure, have read Fountainhead.... I found this to be funny... Maybe because it's almost 1 A.M. and I worked all day... oh well.
Tuesday, May 26, 2009
Revit Blog Post Round-Up!
Labels:
revit blog round-up
0
comments
There have been alot of interesting Revit blog posts the past few days that I would like to note. Some of you maye have seen or read them and some may not have. Either way, enjoy my collection of recent revit blog posts:
There is No “I” in IPD!: AECbytes Viewpoint #45 posted by Gregory Arkin at Revit3D.com - BIMBoom Revitlution - 10 hours ago Great article and credit to http://twitter.com/ArchitectureCo/status/1864550633 There is No “I” in IPD!: AECbytes Viewpoint #45: "Mike Whaley Director of Preconstruction, J. H. Findorff and Son Inc. Grow...
They're doing what with AutoCAD? posted by Gregory Arkin at Revit3D.com - BIMBoom Revitlution - 14 hours ago From the Department of the Inferior and the La-Z-Drafter Rent to Own warehouse. You can now essentially lease AutoCAD for $166 per month. Isn't this how Revit got its start 9 years ago, rental only? ...
extensions4revit - Modeling - Excel Based Model Generation posted by Gregory Arkin at Revit3D.com - BIMBoom Revitlution - 1 day ago I saw a twitter post on this today, so I thought I'd make it a blog post. I'm going to do a little more research on this plugin and see just how easy it is to make a building from Excel. Sounds like quit...
Where are these Model Lines with the error? posted by noreply@blogger.com (Brian Renehan) at Revit Fix - 23 hours ago You have been giving a Revit error warning yet you can’t find the element and Revit doesn’t give you the option of showing them. It’s worth remembering that you can draw area boundary lines in an Area plan ...
Elements have changed category. Tags for these elements are now of the wrong category and will be deleted. posted by noreply@blogger.com (Brian Renehan) at Revit Fix - 2 days ago Another Error warning. This is one of the few errors where Revit does not let you delete the element to fix the problem. The error occurs when a curtain panel element which has been tagged; then is cha...
Slightly off axis and may cause inaccuracies posted by noreply@blogger.com (Brian Renehan) at Revit Fix - 2 days ago More on error warnings. The slightly off axis is a warning that mystifies most users. What does it exactly mean and how do you fix it. The error message is there to warn you when you may think something ...
3500 warnings down to 2 posted by noreply@blogger.com (Brian Renehan) at Revit Fix - 4 days ago We recently had one of our Revit projects go in for planning, and as it is likely to go on and be a Architecture / Structure Revit coordinated project in Design Development, I thought it would be worth doi...
Flip, Flop, Fly Apart Panels: A Workaround posted by Zach Kron at buildz - 3 days ago You've just finished doing Dave's excellent tutorial on dividing and paneling a form in Revit, it looks awesome, now you want to make some renderings to put on your Grandma's Ceiva. You load it into the Revi...
Building a Tensegrity Structure posted by Zach Kron at buildz - 5 days ago Back in November of 2008, when the new Revit massing and paneling tools were but infants, crawling around on the floor of the factory, Matt sends me this link to Lift Architects. They're making tensegrity st...
Seamless Mullions posted by Zach Kron at buildz - 1 week ago I did the Seamless Panel tutorial last week and realized that it ends up begging the question "how do I make a seamless FRAME". Building on that tutorial, here is one method to create such a panel.The result...
Seamless Panels posted by Zach Kron at buildz - 2 weeks ago The new paneling functionality in Revit 2010 does some pretty new and fun stuff. Especially compared to the limitations of the old curtain panels. You can do non-planar, patterned, and all sorts of crazy, ex...
Render Queue (ish) for Revit posted by Zach Kron at buildz - 3 weeks ago I love using the simplified rendering capabilities of Mental Ray in Revit 2009 and 2010, but it’s a hassle to do large numbers of renderings. Unfortunately, there’s no batch render functionality and the API ...
Imports in Families posted by Jeremy Tammik at The Building Coder - 1 day ago I will have left on vacation once again by the time this is posted. In case you wonder why I am on vacation so much, the trip to Italy in March and the wonderful experiences I had there were actually...
Friday, May 22, 2009
The Student to Student Revit Guide - Part 8 - Wall Detail
That's right... I finally started to hack at the Student to Student Revit Guide. Due to popular demand and the Revit Classroom Workflow coming to an end I am going to start showing some minor tutorials on the harbor house.
Todays tutorial will show how to modify a wall and allow it to be shown correctly when using an advanced floor system in Revit.
Topics Covered:
- Editing Wall Style
- Modifying the Base of a Wall
- Allow separate components of the wall to be freely manipulated.
Don't forget to check out all of the Student to Student Revit guide series if you have not yet. Download the CAD file and follow along!
Thursday, May 21, 2009
Tip - View Cube "Home Icon"
Labels:
revit tip,
revit tutorial,
view cube
0
comments
I discovered this a while ago and thought I would share it with you all. I had to create over fifteen 3D views with different phases and sections of the project. Every view had to be at the exact same orientation. Instead of sitting there and trying to eye every view (and killing yourself when you accidently move the view or orbit) use the "home icon" on the view cube.
Wednesday, May 20, 2009
Renzo Piano - Addition to the Art Institute of Chicago
 A Beautiful piece of architecture that I had to share with you all... I can totally see this being designed and built in Revit. Great pictures on the New York Times link below...
Many of his peers gripe that this is because of the subdued nature of his designs — sophisticated but not too threatening or unfamiliar — which seem tailored to ease the insecurities of museum boards. Some envy his elegance, which makes him seem equally at home in corporate boardrooms and lofty cultural circles.
It’s hard to know how these qualities will play out amid the gloom and doom of the new economy. In some ways Mr. Piano’s refined, risk-averse architecture may be more appealing than ever. He is not out to start a revolution. His designs are about tranquillity, not conflict. The serenity of his best buildings can almost make you believe that we live in a civilized world.... Read more...
Tuesday, May 19, 2009
Tutorial - Door Swing Angle (Plan)
So the next video I was going to create was to answer a few questions I had recieved about how to make a door swing at different anlges in plan view. Well... Revit Clinic beat me to it! Great video and write up:
Rotational Parameters and Face-Based Nested Families
We often come across requests or recommendations for adding rotational controls to family geometry. This is most commonly present for door swings, hinge type families, or geometry which needs to rotate around a given point in a family. I wanted to pass along a recommendation which typically works well.
The first step is to separate the family geometry [which will be rotated] into a separate face-based family. Face-Based families offer additional flexibility when placing the nested family into the host family. By utilizing a reference line for the rotational basis, the face-based family can be hosted onto the reference line by the “Place on Work Plane” option. By using the “TAB” key the two planes of the reference line can be specified, as well as the “SPACE” key to designate the nested family rotation during placement.
With the reference line in place and an angular dimension parameter attached, the nested face-based family will rotate with the reference line it is hosted on. I have outlined an example process in the video below:
Video Example
Please keep in mind this process can be applied to other scenarios for family creation. I typically recommend a reference line over a reference plane because a reference line can be aligned and constrained using the end point. This is often useful for a family rotating along an end point. In addition you can check the “Shared” option in the nested family under “Category and Parameters” to ensure visibility and scheduling occur as needed.
Thanks authors of Revit Clinic... Great video and explination!
Monday, May 18, 2009
Revit SIGG Water Bottle!
Labels:
revit SIGG,
revit store,
revit water bottle,
SIGG
0
comments

So your using Revit to do an accurate environmental analysis of your building and using the newest green materials but sitting next to your keyboard is an old Poland Spring bottle you must have refilled 100 times.
After a few weeks you throw the bottle out because of how many tiems your hear that you shouldn't keep refilling plastic bottles. Then you hear about what happens to plastic bottles after you throw them away... it's a lose lose situation!
I finally sucked it up and bought a SIGG water bottle. Of course, a few weeks after I bought mine for 30 bucks CafePress releases them for anyone with a store to use! Now you can have a SIGG waterbottle with a Revit flare to it!
Help save the planet while you rehydrate in style with an eye-catching BPA-free water bottle from SIGG. Made from a single piece of aluminum, it's ultra-lightweight yet rugged and crack-resistant. To minimize unwanted tastes and scents, the inside is lined with a water-based, non-toxic epoxy resin that exceeds FDA leaching requirements.
- Holds 1.0L
- Recyclable & reusable
- BPA-free
- Lifetime warranty
Sunday, May 17, 2009
Tutorial - Attaching Walls to Roofs
I have recieved a number of questions about how to make a wall "attach" to a complex roof or a gabled roof. The answer is simple: Use the Attach Command. Check out the tutorial below...
Topics Covered:
- Using the Attach Command
- Attaching Wall Top to Roof
- Attaching Wall to Complex Roof
- Attaching Wall Bottom to Roof.
Thursday, May 14, 2009
Revit 2010 - Massing Tutorial
Quick little video I found on youtube showing the collaboration between Autocad 2010 and Revit 2010. I wanted to post this mainly to show how easily he turned the mass into walls and curtain systems. Very Cool.
Wednesday, May 13, 2009
Imagining Recovery
Columbia Architecture students Wayne Congar and Troy Therrien launched the Imagining Recovery competition to invite designers from across the world to envision, in a single image, the prospect of post-financial crisis America. In devising these experiential images, and the accompanying design strategies, designers are encouraged to propose responses to some of the following questions. What is it that we hope to recover? How can designers assert the importance of design in recovery (economic and otherwise)? How can designers act as visual interpreters between policy-makers and the general public? How can design support innovation in imagining the future...?
Read more here...
Read more here...
I wish I knew about this competition earlier. The idea is great and I feel it could parallel my ideas about Revit and the future of design. The simple idea of "change" that has been echoing throughout the mainstream since last year being accepted into the design world.
This is the type of thinking we need to further push the idea of technology and creative design. Ease of use and efficient technology can coexist with great ad creative design.
They will be announcing the winners within the next few days.
IDP Training Report - Six Month
For those of you planing to become licensed Architects there has been a little addition to the process called the "Six Month Rule":
The Six-Month Rule for IDP Training Unit Reporting
The Six-Month Rule will require interns to submit their training units in reporting periods of no longer than six months and within two months of completion of each reporting period. The rule will go into effect on 1 July 2009 for interns who begin an NCARB Record on or after that date and 1 July 2010 for all interns regardless of application date. All training unit reports must be submitted electronically through NCARB’s electronic Experience Verification Reporting (e-EVR) system.
The rule stems from a 2005 study conducted by NCARB and AIA that indicated regular reporting improves reporting accuracy, encourages better supervision, and targets needed experience. The IDP Guidelines have long recommended that interns submit reports regularly. Although six months would be the maximum amount of time allowed, interns may—and are encouraged to—report more frequently.
Once interns have submitted their training units by entering them into their Record online, those units are protected from the Six-Month Rule reporting requirements while any loose ends are tied up. Interns will not be affected by any delay caused by their supervisor or NCARB. However, submitted training units can be lost if they are deemed invalid by their supervisor, or if they are not earned in accordance with the rules of IDP.
The Six-Month Rule only applies to interns. It does not apply to registered architects that must document past experience for NCARB certification.
All of the provisions of the Six-Month Rule are designed to make every internship experience more constructive and valuable. The rule will greatly improve the accuracy of reporting, which should help reduce the amount of time it takes interns to complete the IDP.
Six-Month Rule Implementation Timeline
31 December 2008 – Launch of online reporting system for IDP training units.
1 July 2009 – Six-Month Rule goes into effect for interns who begin an NCARB Record on or after this date.
1 July 2010 – Six-Month Rule goes into effect for all interns regardless of when they started their NCARB Record.
Six-Month Rule Examples – The Committee on the IDP has compiled examples to help interns understand the basics of the rule.
Available Extensions – Similar to the NCARB’s ARE Rolling Clock, the Six-Month Rule will have extensions available for:
Birth or adoption of a child (six months)
Serious medical conditions
Active military service
Extensions will require documentation. The procedures for applying for an extension will be available when the Six-Month Rule goes into effect.
Tuesday, May 12, 2009
The Power of BIM
Labels:
BIM video,
power of BIM,
revit video
0
comments
A cool video I found. Looks to be for a firm but has some great animations and visualizations...
Take what you will from it... I think its cool..
Take what you will from it... I think its cool..
Update: Revit 2010 Keyboad Shortcuts
I recieved a few emails about some information on the shortcut list I posted today. It appears as though a majority of them are the same but there are people creating an updated list on the AUGI forums...
Thanks for the tip Alan!
Revit 2010 Keyboard Shortcuts
With the release of Revit 2010 creating quite a stir due to the ribbon bar I thought it would be helpful to repost a keyboard shortcut list. I use alot of these shortcuts and they do help out greatly in both Revit 2009 and Revit 2010.
The shortcut list that follows is based off of Revit 2009 but I have yet to see any differences in 2010. Please comment if you know of any new or changed shortcuts.
Modelling menu
File menu
"ER" menu:"File-Editing Requests"
"RL" menu:"File-Reload Latest""RW" menu:"File-Reload Latest"
Edit menu
"DE" menu:"Edit-Delete"
"MD" menu:"Edit-Modify"
"SA" menu:"Edit-Select All Instances"
"MV" menu:"Edit-Move"
"CO" menu:"Edit-Copy"
"RO" menu:"Edit-Rotate"
"AR" menu:"Edit-Array"
"MM" menu:"Edit-Mirror"
"RE" menu:"Edit-Resize"
"GP" menu:"Edit-Group-Create Group"
"EG" menu:"Edit-Group-Edit Group"
"UG" menu:"Edit-Group-Ungroup"
"LG" menu:"Edit-Group-Link Group"
"EX" menu:"Edit-Group-Exclude Member"
"MP" menu:"Edit-Group-Move Member to Project"
"RB" menu:"Edit-Group-Restore Excluded Member"
"RA" menu:"Edit-Group-Restore All"
"AP" menu:"Edit-Group-Add to Group"
"RG" menu:"Edit-Group-Remove from Group"
"AD" menu:"Edit-Group-Attach Detail"
"PG" menu:"Edit-Group-Group Properties"
"FG" menu:"Edit-Group-Finish Group"
"CG" menu:"Edit-Group-Cancel Group"
"PP" menu:"Edit-Pin Position"
"UP" menu:"Edit-Unpin Position"
"CS" menu:"Edit-Create Similar""PR" menu:"Edit-Properties"
View menu
"ZR" menu:"View-Zoom-Zoom In Region"
"ZO" menu:"View-Zoom-Zoom Out (2x)"
"ZF" menu:"View-Zoom-Zoom To Fit"
"ZE" menu:"View-Zoom-Zoom To Fit"
"ZA" menu:"View-Zoom-Zoom All To Fit"
"ZS" menu:"View-Zoom-Sheet Size"
"ZP" menu:"View-Zoom-Previous Scroll/Zoom"
"VP" menu:"View-View Properties"F8 menu:"View-Dynamically Modify View
"VG" menu:"View-Visibility/Graphics"
"HH" menu:"View-Temporary Hide/Isolate-Hide Element"
"HI" menu:"View-Temporary Hide/Isolate-Isolate Element"
"HC" menu:"View-Temporary Hide/Isolate-Hide Category"
"IC" menu:"View-Temporary Hide/Isolate-Isolate Category"
"HR" menu:"View-Temporary Hide/Isolate-Reset Temporary Hide/Isolate"
"EH" menu:"View-Hide in view-Elements"
"VH" menu:"View-Hide in view-Category"
"EU" menu:"View-Unhide in view-Elements"
"VU" menu:"View-Unhide in view-Category"
"WF" menu:"View-Wireframe"
"HL" menu:"View-Hidden Line""SD" menu:"View-Shading with Edges"
"AG" menu:"View-Advanced Model Graphics""TL" menu:"View-Thin Lines"
"RR" menu:"View-Rendering-Raytrace"
F5 menu:"View-Refresh"
Modelling menu
"DR" menu:"Modelling-Door"
"WN" menu:"Modelling-Window""CM" menu:"Modelling-Component"
"LI" menu:"Modelling-Lines"
"RP" menu:"Modelling-Ref Plane"
Drafting menu
"DI" menu:"Drafting-Dimension"
"EL" menu:"Drafting-Spot Dimension-Spot Elevation"
"TX" menu:"Drafting-Text"
"GR" menu:"Drafting-Grid"
"LL" menu:"Drafting-Level"
"TG" menu:"Drafting-Tag-By Category"
"RM" menu:"Drafting-Room"
"RT" menu:"Drafting-Room Tag"
"DL" menu:"Drafting-Detail Lines"
Site menu
Tools menu
F7 menu:"Tools-Spelling"
"MA" menu:"Tools-Match"
"LW" menu:"Tools-Linework"
"PT" menu:"Tools-Paint"
"SF" menu:"Tools-Split Face"
"AL" menu:"Tools-Align"
"SL" menu:"Tools-Split Walls and Lines"
"TR" menu:"Tools-Trim/Extend"
"OF" menu:"Tools-Offset"
Settings menu
"SU" menu:"Settings-Sun and Shadows Settings"
"UN" menu:"Settings-Project Units"
Window menu
"WC" menu:"Window-Cascade"
"WT" menu:"Window-Tile"
Help menu
Snap overrides
"SI" snapcode:"Intersections"
"SE" snapcode:"Endpoints"
"SM" snapcode:"Midpoints"
"SC" snapcode:"Centers"
"SN" snapcode:"Nearest"
"SP" snapcode:"Perpendicular"
"ST" snapcode:"Tangents"
"SW" snapcode:"Work Plane Grid"
"SQ" snapcode:"Quadrants"
"SX" snapcode:"Points"
"SR" snapcode:"Snap to Remote Objects"
"SO" snapcode:"Snaps Off"
"SS" snapcode:"Turn Override Off"
Alternates with closer key spacing
"ZZ" menu:"View-Zoom-Zoom In Region"
"ZX" menu:"View-Zoom-Zoom To Fit"
"ZC" menu:"View-Zoom-Previous Scroll/Zoom"
"ZV" menu:"View-Zoom-Zoom Out (2x)"
"VV" menu:"View-Visibility/Graphics"
"CC" menu:"Edit-Copy"
Also, if you would like to edit/change your Revit 2010 keyboard shortcuts they can be found at: "C:\Program Files\Autodesk Revit Architecture 2010\Program". The file is a .txt file. There are instructions within the file as to how you can create your own Revit shortcuts.
The shortcut list that follows is based off of Revit 2009 but I have yet to see any differences in 2010. Please comment if you know of any new or changed shortcuts.
- PDF - Revit Keyboard Shortcuts (Credit to DavidDriver.com)
- HOK Blogpost (Where I originally found the list).
Modelling menu
File menu
"ER" menu:"File-Editing Requests"
"RL" menu:"File-Reload Latest""RW" menu:"File-Reload Latest"
Edit menu
"DE" menu:"Edit-Delete"
"MD" menu:"Edit-Modify"
"SA" menu:"Edit-Select All Instances"
"MV" menu:"Edit-Move"
"CO" menu:"Edit-Copy"
"RO" menu:"Edit-Rotate"
"AR" menu:"Edit-Array"
"MM" menu:"Edit-Mirror"
"RE" menu:"Edit-Resize"
"GP" menu:"Edit-Group-Create Group"
"EG" menu:"Edit-Group-Edit Group"
"UG" menu:"Edit-Group-Ungroup"
"LG" menu:"Edit-Group-Link Group"
"EX" menu:"Edit-Group-Exclude Member"
"MP" menu:"Edit-Group-Move Member to Project"
"RB" menu:"Edit-Group-Restore Excluded Member"
"RA" menu:"Edit-Group-Restore All"
"AP" menu:"Edit-Group-Add to Group"
"RG" menu:"Edit-Group-Remove from Group"
"AD" menu:"Edit-Group-Attach Detail"
"PG" menu:"Edit-Group-Group Properties"
"FG" menu:"Edit-Group-Finish Group"
"CG" menu:"Edit-Group-Cancel Group"
"PP" menu:"Edit-Pin Position"
"UP" menu:"Edit-Unpin Position"
"CS" menu:"Edit-Create Similar""PR" menu:"Edit-Properties"
View menu
"ZR" menu:"View-Zoom-Zoom In Region"
"ZO" menu:"View-Zoom-Zoom Out (2x)"
"ZF" menu:"View-Zoom-Zoom To Fit"
"ZE" menu:"View-Zoom-Zoom To Fit"
"ZA" menu:"View-Zoom-Zoom All To Fit"
"ZS" menu:"View-Zoom-Sheet Size"
"ZP" menu:"View-Zoom-Previous Scroll/Zoom"
"VP" menu:"View-View Properties"F8 menu:"View-Dynamically Modify View
"VG" menu:"View-Visibility/Graphics"
"HH" menu:"View-Temporary Hide/Isolate-Hide Element"
"HI" menu:"View-Temporary Hide/Isolate-Isolate Element"
"HC" menu:"View-Temporary Hide/Isolate-Hide Category"
"IC" menu:"View-Temporary Hide/Isolate-Isolate Category"
"HR" menu:"View-Temporary Hide/Isolate-Reset Temporary Hide/Isolate"
"EH" menu:"View-Hide in view-Elements"
"VH" menu:"View-Hide in view-Category"
"EU" menu:"View-Unhide in view-Elements"
"VU" menu:"View-Unhide in view-Category"
"WF" menu:"View-Wireframe"
"HL" menu:"View-Hidden Line""SD" menu:"View-Shading with Edges"
"AG" menu:"View-Advanced Model Graphics""TL" menu:"View-Thin Lines"
"RR" menu:"View-Rendering-Raytrace"
F5 menu:"View-Refresh"
Modelling menu
"DR" menu:"Modelling-Door"
"WN" menu:"Modelling-Window""CM" menu:"Modelling-Component"
"LI" menu:"Modelling-Lines"
"RP" menu:"Modelling-Ref Plane"
Drafting menu
"DI" menu:"Drafting-Dimension"
"EL" menu:"Drafting-Spot Dimension-Spot Elevation"
"TX" menu:"Drafting-Text"
"GR" menu:"Drafting-Grid"
"LL" menu:"Drafting-Level"
"TG" menu:"Drafting-Tag-By Category"
"RM" menu:"Drafting-Room"
"RT" menu:"Drafting-Room Tag"
"DL" menu:"Drafting-Detail Lines"
Site menu
Tools menu
F7 menu:"Tools-Spelling"
"MA" menu:"Tools-Match"
"LW" menu:"Tools-Linework"
"PT" menu:"Tools-Paint"
"SF" menu:"Tools-Split Face"
"AL" menu:"Tools-Align"
"SL" menu:"Tools-Split Walls and Lines"
"TR" menu:"Tools-Trim/Extend"
"OF" menu:"Tools-Offset"
Settings menu
"SU" menu:"Settings-Sun and Shadows Settings"
"UN" menu:"Settings-Project Units"
Window menu
"WC" menu:"Window-Cascade"
"WT" menu:"Window-Tile"
Help menu
Snap overrides
"SI" snapcode:"Intersections"
"SE" snapcode:"Endpoints"
"SM" snapcode:"Midpoints"
"SC" snapcode:"Centers"
"SN" snapcode:"Nearest"
"SP" snapcode:"Perpendicular"
"ST" snapcode:"Tangents"
"SW" snapcode:"Work Plane Grid"
"SQ" snapcode:"Quadrants"
"SX" snapcode:"Points"
"SR" snapcode:"Snap to Remote Objects"
"SO" snapcode:"Snaps Off"
"SS" snapcode:"Turn Override Off"
Alternates with closer key spacing
"ZZ" menu:"View-Zoom-Zoom In Region"
"ZX" menu:"View-Zoom-Zoom To Fit"
"ZC" menu:"View-Zoom-Previous Scroll/Zoom"
"ZV" menu:"View-Zoom-Zoom Out (2x)"
"VV" menu:"View-Visibility/Graphics"
"CC" menu:"Edit-Copy"
Also, if you would like to edit/change your Revit 2010 keyboard shortcuts they can be found at: "C:\Program Files\Autodesk Revit Architecture 2010\Program". The file is a .txt file. There are instructions within the file as to how you can create your own Revit shortcuts.
Monday, May 11, 2009
Adobe Photoshop
We are finally approaching the very last step of our Revit Classroom Workflow chart. I would like to introduce a few programs to you before I continue explaining the last step, Presentation.
"Communicating concepts visually to clients, regulators, and colleagues can be a challenge. New Adobe® Photoshop® CS4 Extended software delivers powerful tools to help you convey details clearly, articulate complex concepts, and report progress on projects in a visually compelling and dynamic way. What’s more, you can automate common tasks to save valuable time.
Comprehensive 3D painting and compositing capabilities, expanded 2D and 3D measurement tools, and a streamlined Adjustment and selection workflow are just a few of the features that enable you to work more efficiently and make a greater impact with all of your drawings, designs, and communications. Photoshop CS4 Extended is part of Adobe Creative Suite® 4 Design Premium edition."
Today I would like to introduce you to Adobe Photoshop. There are many different photo editing programs that could be used to "post-edit" your renderings but Photoshop tops my list. During the Presentation step I will explain to you the many ways I utilize this program to complete my presentation ready Revit project.
Adobe does offer student discount for their software: See this link.
Here is a little information and links:
Comprehensive 3D painting and compositing capabilities, expanded 2D and 3D measurement tools, and a streamlined Adjustment and selection workflow are just a few of the features that enable you to work more efficiently and make a greater impact with all of your drawings, designs, and communications. Photoshop CS4 Extended is part of Adobe Creative Suite® 4 Design Premium edition."
Some Tutorials:
- Engineering and Architectural Workflow Tutorial
- Creating perspective-accurate visualizations with Vanishing Point
Stay tuned to see how you could use this software to create great presentation boards, renderings, and images.
Saturday, May 9, 2009
Building Information Modeling Videos.
Labels:
autodesk BIM,
BIM,
BIM videos,
building information modeling,
IPD,
phil bernstein
0
comments
I was bored the other day and began to explore the Autodesk BIM website. I found some great videos by Phil Bernstein and others about BIM... I am not sure if they have always been there, but I have never seen them before:
"Wondering how Integrated Project Delivery works? Download this pdf to view an informative example of its five integral phases."
- Introduction to Building Information Modeling (BIM)
- Detailed Overview of BIM
- Elimination of Errors and Omissions
- Increase Efficiency
- Enable New Ways of Working
I also ran by this PDF about IPD (Integrated Project Delivery):
Parallel this PDF with my Revit CLassroom Workflow and Greg's BIM Cycle and you have yourself a great understanding of what IPD and BIM really mean!
Friday, May 8, 2009
Revit Sucks!
Labels:
archinect,
revit rant
37
comments
He Says: "That's right... you heard it..."
I ask: "But why?"
He responds: "Uh... I don't know... it just does".
Oh it is an ongoing saga. Is it really worth trying to force those non-believers into believing? I say it's not. I have yet to hear a plausible argument behind the idea "Revit Sucks!".
A couple of the posts on that discussion I would like to pick apart:
- "As a schematic generator and scheduling, it's great. I'm not to keen on it for C.D.s"
Definitely never used the program before.
- "Archicad is more flexible and was the innovator..."
- "Would be perfect if it was command based"
- "Projects with curves, non-standard wall assemblies, complex curtain walls, i.e. most of the stuff that makes architecture fun, is not so easy with Revit. You may as well use a good 3d model (rhino because of its acad compatibility seems like the best option these days) and adapt plans, sections, elevations, and details to documents in 2d. and in regards to who is using the program, i found its greatest proponents to be students and firm principals, both of whom have had little to no real world, hands-on project experience with the technology. not to say that revit will not become the industry standard. if clients and contractors begin to demand it, it goes without saying that it will be the future, but it will also have major implications for the way we design. (similar to the way acad changed design in the nineties.)"
First off, that was impossible to read without the use of capitol letters. Secondly, you just don't get it! People like that last response will never get it. It is not worth it to try to make them get it. Out of all the nonsense in that last response the idea that Revit will change design for the worse boggles my mind.
I want all of my readers and followers to remember that these arguments are simply not worth it. Become an intelligent building modeler along with your ambition and your creativity and your actions will speak much louder.
Do not let people like that bring you down... The Revitlution is stronger than that! Muwahaha.
Thursday, May 7, 2009
Revit 2010 Tutorial - Seamless Panels
buildz posted a sweet Revit 2010 tutorial about creating seamless panels using the new panel family:
The new paneling functionality in Revit 2010 does some pretty new and fun stuff. Especially compared to the limitations of the old curtain panels. You can do non-planar, patterned, and all sorts of crazy, expensive stuff. One problem I hear about is people having difficulty making seamless edges...
Wednesday, May 6, 2009
Autodesk 2010 Software Now Avaliable for Students.
I know I mentioned the release of Revit 2010 on the Autodesk Student Community long before this email (which I recieved yesterday) but now all the programs are out!
Changing the Way Students Design for the Future
As the school year comes to a close, summer is the time to download the new versions of your favorite digital design software - or try out a new product. Become proficient with the tools design professionals use worldwide, so you can make an impact on your future.
There are now more than 20 Autodesk products available for free* download on the Student Engineering & Design Community! And, for the first time ever, we're making AutoCAD® 2010 available as well.
The Student Community expands the portfolio of products you can use to develop the skills you need in design industries such as mechanical engineering, industrial design, architecture, civil and structural engineering, and the digital arts. It will also help you gain expertise in the growing industry trends of Digital Prototyping, building information modeling (BIM) and sustainable design.
Free* 2010 Software Includes:
• AutoCAD® (new!)
• Autodesk® Revit® Architecture
• AutoCAD® Inventor® Professional Suite
• AutoCAD® Civil 3D®
• Autodesk® Alias® Automotive
• Autodesk® Showcase®
• AutoCAD® Map 3D
...and more!
Revit 2010... Suck it up and go for it!
Some great blog posts to read about Revit 2010:
- Autodesks explination about Revit 2010 and the reason behind the much talked about Ribbon Tool bar. (Credit to Revit3d.com)
Don't be afraid of change... give it a chance!
Revit Classroom Workflow - Step 5
Pre-Presentation
The days before the dreaded "final review" are what makes and breaks an architecture student. Essentially, it consumes the entire semester and becomes the most important piece of school work to finish. We have all heard and told our sleepless, caffeine filled, and endless final review stories. Sadly, with Revit, those nights will be shorter but may not go away. On the positive side, you will most likely have time to at least sleep an hour or two before presenting.
Thankfully, because Revit forced your mind to think in many dimensions it has never thought in before your building will actually make sense. The rush to coordinate your CAD elevations and plans, while building a physical model between every few lines drawn in CAD, have been eliminated. Your elevations and plans will always match... because they are all created from the same model! I know, how great is that? This will give you tons of free time to build your physical models while rendering some photo-realistic scenes in Revit.
Here are some of my personal tips to efficiently and intelligently manage your time while using Revit in the classroom:
- Create a Schedule: This could easily apply to a student not using Revit, but I will apply it to one using Revit. I find it to be so very crucial to create a simple schedule the day you receive the program of a project. Set concrete dates as to when you plan to finish each step of the project. Following this schedule will not only help you finish your work on time but also prepare you for the real world (where everything depends on these stupid schedules). Also, don't forget to add a good week extra if you plan to render in Revit (Until Autodesk addresses rendering times the way they should be, be prepared to wait.)
- Socialize and Discuss: Due to the easy nature of making changes in Revit and it's ability yo easily "tell the story" of your building discussion is key. Throughout the entire design process discuss and show all of your ideas with your peers and professor. I have learned that something as simple as another student saying, "Um... why's that door over there?" will force you to think more about your building and why you designed what you did. It also gives you a chance to pick up on mistakes that could easily be breezed over until you pin that drawing to the wall.
- Print "Check-Sets": You are now using a program that will have you way ahead of schedule when creating sheets. Revit has the ability to pump out sheets like no other program. You pay a pricey tuition to be in that school... USE THEIR PAPER. Print everything you can as many times as you want. Far too many times I see fellow students waiting till last minute to print. The first set they print is what goes on the wall and guess what... they look like crap! Line weights are all wrong, viewports and cutting things off, and the titleblock isn't even centered. Take the time to print throughout the entire design process. Grab a red pen... pretend you are your boss and redline the crap out of it!
Now it's time to add the good old wow factor in our last step of the Revit Classroom Workflow... To be continued..
Tuesday, May 5, 2009
Green Templates - Ecotect
Labels:
autodesk ecotect,
ecotect
0
comments
Great couple of posts about Ecotect and the vast amount of information you can pull from it.
- Green Templates: Part 1 - Indoor Analysis and Glazing
- Green Templates: Part 2 - Revit Architecture and Ecotect
These go along perfectly with the Analyzation step of our Revit Classroom Workflow.
Greg at Revit3D.com is an authorized reseller for Ecotect. Please contact him if you are interested in purchasing and let him know you heard it hear!
Buildz Blog.
Interesting new blog:
"Welcome to the opening post of buildz, a blog about building stuff: real stuff, imaginary stuff, digital stuff, my stuff, other people's stuff, funny stuff, serious stuff . . ."
Architectural Designer and Software Analyst for Autodesk. Disclaimer: The materials contained and the opinions expressed on this blog are my own and are not necessarily those of Autodesk.
Some very cool Revit renderings and objects.
About the author:
Monday, May 4, 2009
Tutorial - Custom Material Creation
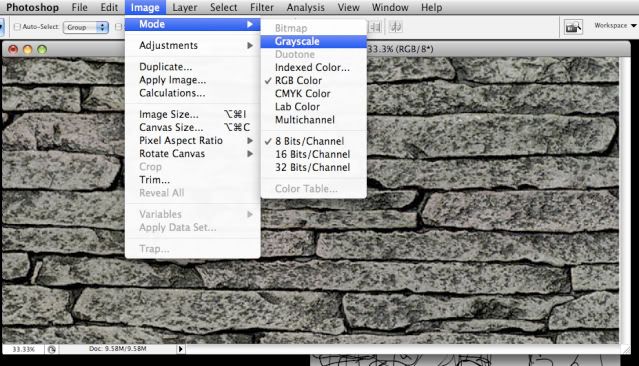
This is a topic that has always been brought to my attention and asked. I never really touched the subject until I was forced too. Revit has great built in rendering materials, but it might not have the specific stone you are looking for. Using a stone material example, here is how to create a nice custom rendering material for revit.
My program of choice is Photoshop. There are many other programs that can create this effect for you.
First, find good image of the material you are looking for. The higher the resolution and quality of the image the better. Here is my starting image:

Next, open the image in Photoshop (or whatever photo editing program you prefer). Save the image as the same name with "_Bump" at the end. You can use any name but I prefer the same file name with bump for ease of use. The objective now is to create a bump map. This uses white and black to create literally a "bump" when rendered. Giving the illusion that it is really stone.
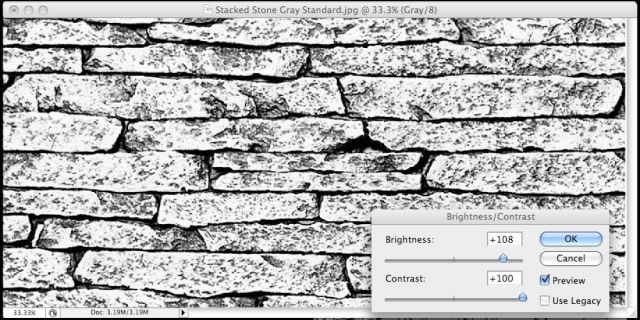
In photoshop, Grayscale the image...
Once all of the color is removed from the image I like to adjust the contrast and brightness to really bring out the contrast between black and white. Here is the setting I used for this particular image.
Now you should have two images; The original with color, and the new bump map image that should look similar to the one below.

Finally, import and render! See video below.

Sunday, May 3, 2009
Revit Comic

Remember the architect comic strip I mentioned a while ago (Arch.Maaik)? Well here is a Revit strip from a couple days ago. Click the image to see it better.
The Life of an Architecture Student.
Cool video over at ArchDaily. Narrative slideshow telling a normal day as an architecture student.
Andekan - Revit Components done Right.
Labels:
andekan,
andy andekan,
revit components
0
comments
Following up on my previous Revit Components Rant I would like to mention a company that stands for what I meant. Andekan creates Revit components for Architects, Engineers, etc... The pricing is not out of control for what you get.
"Our focus is on building geometrically precise and information rich families that maximize Revit’s parametric content engine. Our content stands out among other providers for its high level of detail, light file size, and fast performance within Revit."
Andekan states right in their website:
"Our focus is on building geometrically precise and information rich families that maximize Revit’s parametric content engine. Our content stands out among other providers for its high level of detail, light file size, and fast performance within Revit."
That is basically what I was talking about in my post! I first heard about this company because they have a completely parametric human model for Revit (which I have yet to receive for free like I was supposed to!).
They have some free samples to download... so check them out.
The idea that I want you to keep in mind is that they are a company that generates revenue by modeling a parametric component tailored to the architect or engineers needs. This is what you need to be doing. Not downloading a fan that was built in Revit 7.1 because it was free. Take your time and create usable, precise, and accurate components... it will only benefit you in the long run.
- Here is a link to Andekans Website.
- Here is a link to Andy... who I am still waiting for along with the rest of us Revit bloggers.
Contact Greg at Revit3D.com for more information as well... be sure to mention you heard it here first!
Saturday, May 2, 2009
Tutorial - Revit Decals
Labels:
place picture,
revit 2010 tutorial,
revit decal,
revit image,
revit picture,
revit picture on wall,
revit tutorial
0
comments
Paul asked,
"I have a question for you, and if you can answer it that would be great. I want to put pictures or images on the wall. I want to just take a basic picture from a file and put it on the wall. I can't seem to figure that out."
Paul was not the only person who emailed me asking roughly the same question. Therefore, I decided to make a short video on the easiest way to go about it.
Topics Discussed:
Friday, May 1, 2009
Revit 2010 Links and Videos.
Some interesting Revit 2010 posts and links I have found:
And a couple videos:
Subscribe to:
Posts (Atom)

The Revit Kid.com! by Jeffrey A. Pinheiro is licensed under a Creative Commons Attribution-NonCommercial-NoDerivs 3.0 Unported License. Based on a work at The Revit Kid.com.