Tuesday, March 30, 2010
Monday, March 29, 2010
Troubleshooting Revit 2011 - Video Tutorials
Click here to view the rest of the selections....
Saturday, March 27, 2010
More, more, more! Revit 2011
Great video below from Greg over at Revit3D.com
Thursday, March 25, 2010
More Revit 2011 Info!!
Ribbon and UI
So let me start with the interface, as this has been a constantly debated, argued, discussed subject amongst many a Revit user on the AUGI forums. So these are the headliners for UI improvements.
- Contextual Tab display
- Contextual Tab display behaviour
- Modeless Properties Palette
- Modify Tab is both static and contextual
- Modify Tools improvements
- Quick Access Toolbar customization
- Resizable Dialogs
- Worksets and Design Options
The most obvious improvement and a complaint I personally had with 2010, was actually getting access to modification tools. 2011 allows rapid access to modification tools, no more clicking backwards and forwards between Ribbon tabs. When you select a tool and start to work with it, the modify tools are constantly at hand. The Ribbon also seems to be a lot faster and there is icon clarity with other Autodesk solutions. The other obvious change is the disappearance of the Type selector from the Ribbon. This is not going to be to everybody's taste; as it now resides in a modeless Properties Palette.
Continue to post for more information, pictures, and videos....
I have to say... This looks like it will be quite the release. It appears that wishlist items have finally been taken into consideration.... I cannot wait to use it!
I will also do my best to cater to my fellow students and finding out when the Autodesk Student Community will get the new releases...
Revit 2011 - New Features and Screenshots

Tuesday, March 23, 2010
Tutorial - Room Size Label (Revit Rocks)
Parametric Room Label

This family tutorial will teach you some cool stuff about nested families and parameters and also save you a ton of time if you ever need to label room sizes.
We teach you how to nest an annotative family in a model family, link it up the local parameters and tie it all together with reference planes that result in downstrean shape handles at the project level.
Once the family is loaded into the project you can 'align and / or lock' the nested / controlling reference planes to walls or parallel edges and the room size label updates . Use the 'align tool' or select the family and use the shape handles.
* The lessons learned here on nesting an annotation family within a model family and being able to nudge or move 'the annotation' part of the model family at the project level is NOT widespread knowledge.
Below is an embedded playlist with 1 CADclip demonstrating the family in action and 3 more CADclips showing you how to build the family yourself from scratch.
Friday, March 19, 2010
Tutorial - Vinyl Siding (CAD Notes)
We have discussed how we can define wall structure horizontally.

Now the problem is, how can we define the structure vertically? We have discussed how we can add reveals and sweeps to do this. In this article, let us discuss how we can create a vinyl siding wall as example. The common way (and probably most suggested) to do this is simply using horizontal lines pattern, not actually creating real 3D forms. And later, we can use drafting tools to add details for the vinyl siding wall.
The reason why we do this is creating many horizontal sweeps/reveals can take much of your computerresources. When you are modeling a large building, this can be a problem. Of course, there are a downside: you have to take care the details later, manually.
Now, vinyl siding wall commonly used for simple houses, not multi story building. So I guess it is save if we create a real 3D vinyl siding, it would be acceptable.
Creating Reveal Profile
Create a new profile. Use Metric Profile-Reveal.rft (or Profile-Reveal.rft for imperial).
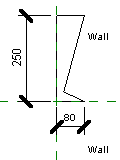
You need to define how your vinyl siding layer will be cut by this profile. Create reveal like below. Pay attention to the wall location. I use 250×80 as the outline. Remember this value, we are going to need it when defining our wall.
Save this file, and load it to your project.
Now why are we using reveal instead of sweep? You will see the difference later in the comparison section.
Applying the Wall Reveal
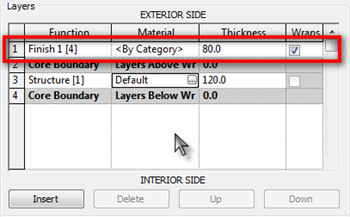
In your project, choose one of the wall type you want to modify. In this example I use generic 200mm. Duplicate, and add one more layer as your vinyl siding layer. Change the height to match your sweep profile.
To enable us adding reveal, change the view to section. Change it from drop down selection below the preview area.
![]()
In the modify vertical structure group, click reveal.
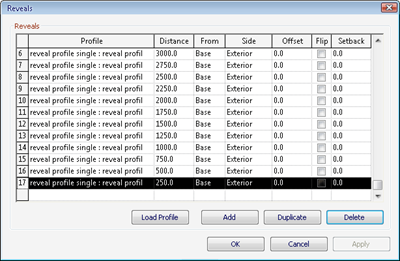
This will open another dialog box. Click add below this dialog to add a reveal definition. Select the reveal profile you created previously in the profile column. If you haven’t loaded it, click load profile.
Define the distance from base. Do it several times until it reach the highest wall in your design.
We are done. Click OK and close all the dialogs.
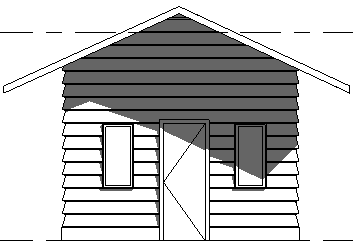
Now try to create walls and see how it looks like. I think this is quite nice :)
Tutorial - Moving Views Around (Revitize)
Moving a set of views from one sheet to another
Revit does not allow the same DWG view to be placed in more than one sheet. For this reason, when we want to move a set of views from one sheet to another, it does not let copy or cut and paste. It gives a “multiple instances of the same view in sheets not supported!”
Wednesday, March 17, 2010
Tip - Plan Regions Wall Cleanup (Revit Clinic)
Plan Regions Wall Cleanups and Large Coordinates
The symptom of this condition are wall cleanups which vary from view to view. For example a primary view and a dependent view. If you come across walls not cleaning up as expected in one view let's look at the following scenario:
Let's take a Revit plan view which contained an object well over the 2 mile origin at some point. When this object was present, the cut line for the view range extended to include this object.
At some point several plan regions were added to this view. Each plan region was set to a different cut plane dimension.
The plan regions captured the large coordinates and this could potentially disrupt wall cleanups. You may also notice that some rooms and room tags are not visible in the view exhibiting this behavior.
Should you come across this, you can resolve it using the following process:
Click here to view the steps as well as a video....
Revit Sweeper : Worth While in 10 years?
From Dave:
Just for fun and to add a deeper level of explanation-
Starting back in the good old days of DOS and perhaps earlier, the wild card character "*" meant search for any number of characters. The wild card character "?" meant search for any single character. So the search string "*.0*.r??" should be interpreted as "any number of characters, period (dot), zero, any number of characters, dot, the letter "r", any single character, any single character. This may very well find Revit backup files, but it has the potential to find other files as well. Also, should it happen that your Revit file has been edited more than 999 times, the first number in the 4-digit revision number would not be a zero, so “.0*.” would not find them. Perhaps your revit sweeper program has greater value than you think.
From David:
To extend what Dave was saying. That search string would also find any other files whose extension (3 letter) started with .R__, see this link for a listing.
So will Revit Sweeper be more valuable in the future? What happens ten years from now and you still have that Revit Families folder and you have managed to edit that same cabinet over 1000 times, and maybe that same window 2500 times?! You will have to do a seperate search for: *.0*.rvt, *.1*.rvt... etc... Also, if you are using a simple program such as Winrar to zip or unzip files... The *.0*.r?? could easily pick up a file called "TestFolder.01.rar" or something along those lines.
It is safe to say that Revit Sweeper does have a place on this earth... As of now, it is for free to download until the bandwith of my free hosting service is full... Once it is full, I might think about charging for the software in order to cover the hosting costs of the file.
So go to Revit Sweeper.com and get your free copy now before it's too late!!
Tuesday, March 16, 2010
Revit Tip - Delete Backup Files
- *.0*.rvt
- *.0*.rfa
*Edit* I have now also been informed that you can type: *.0*.r??
Tutorial - Formula Driven Curves (Buildz)
Formula Driven Curves and Surfaces


Monday, March 15, 2010
The Revit Kid.com's - Revit Sweeper
The Revit Kid.com presents:
Revit Sweeper!
Initially, Revit Sweeper was a practice program that I developed in order to hone my programming skills. It turns out that I have found it very useful. I have decided to release it to the public in hopes of making my fellow Revit user's lives a bit more easy.
What is it?
How many Revit projects are you working on? How large are they? How many families are in your "Revit Family" Directory? Now, take the size and multiply it by 4... That is how much space Revit Backup files are using on your hard drive.
Revit Sweeper is a very simple little Windows program that searches a specified directory for Revit backup files. Then, per the users request, deletes them.
Features:
- Search by directory.
- Removes the hassle of control clicking in every directory and deleting Revit backup files.
- Frees up precious hard drive space.
- Works with backup files from all versions of Revit.
- Right now, Revit Sweeper will only delete files in the Selected Directory and on level of sub Directories. The reason for this was simply performance related. Not to mention a typically Revit Family Directory consists of a root folder, "Revit Families", and one level of sub-directories; "Doors", Windows", etc...
Tutorial - Wall Colors
Tutorial Covers:
- Creating new Materials
- Editing wall materials.
- Painting Surfaces
- Coordinating painted surfaces.
- Managing mulitiple wall colors.
Click here to view the video....
Spring Break! ... I think?
Thursday, March 11, 2010
Quick Tip - Reference Lines and Massing
Conceptual Mass Forms & Reference Lines
Here’s a quick tip regarding reference lines and forms in the conceptual mass interface:
When a form is created the original lines will be deleted when you delete the form. If you created the form with reference lines however they do remain when the form is deleted. This tip was posted a while back in this post.
But let’s say you created a form with lines and you need to both delete the form and maintain the original lines.
You can trace the original form with reference lines, or pick points with reference lines. Also you can enable 3D Snapping to trace any points on the form if you needed a particular portion of it.
If snapping to 3D points to create reference lines, you will need to cut the points to the clipboard prior to deleting the form. After the form is deleted you can paste > same place and create a new form as needed from the reference lines.
Here’s a quick video [no sound] displaying an example of these 2 options:
Video Example
Hope this helps!
Monday, March 8, 2010
Tutorial/Tip - Render Images Missing
The following render appearance images are missing
Common scenario when rendering is to have some materials use custom image files. I have included the 3 most common areas to check should you receive the “The following render appearance images are missing:” warning when rendering below:
1. As a best practice try to store all custom image files in one location. Wherever these image files are located, ensure that the path is specified under Options > Rendering > Additional Render Appearance Paths.
Add the path[s] where the images are stored here, and then re-render the scene to see if the warning persists.
2. If the materials are stored on a network location, verify the location appears in the list above as an additional render appearance path. Also make sure all users have access to this folder.
3. Depending on the application which created or saved the image file the material uses, Revit may not be able to load the image file for rendering. In most cases this may occur with certain JPEG compression modes and will generate the same warning message at render.
One easy test is to open the image file and save it as .PNG format instead. Edit the Revit material to point to the .PNG format image to see if this eliminates the warning when rendering.
Wednesday, March 3, 2010
Tutorial - 10 Family Tips (Revit Clinic)
Click here to see the post and tips...
Click here to see a tip about Wall Cut Patterns...
Tuesday, March 2, 2010
Revit.biz - Forums!!!
A very warm welcome to revit.biz!
My name is Ian. I’m an architect living and working in the UK. Oh, by the way I absolutely adore Autodesk Revit! So much so in fact that in June 2007 I started a website dedicated to the discussion of all things Revit. That website was Revit Zone.

I first got introduced to Revit in 2004. Within a matter of weeks I was a Revit Convert! And since that time, I have become more enthused by Revit every day. It quickly became apparent to me that BIM (Building Information Modelling) was the way forward- a huge leap on from the “dumb” 2D CAD systems I was used to using. But it was also apparent that for a lot of people the change in mindset was not an easy one. So I decided to write about my experiences with Revit and produce a series of articles that (hopefully) eased the transition to BIM from 2D CAD.
In January 2010 I decided to take what I had learnt from Revit Zone and start a new website, revit.biz. The content and informal writing style remains the same, while improvements have been made to the navigation and usability- particularly with respect to the Forums.
revit.biz is simply divided into the following areas:-
News
The Home Page is where you can find all the latest news from the world of Revit. New articles (both on revit.biz and other Revit websites) are posted here.
Articles

Split into seven categories, the database of articles cover various aspects of Revit and will help you get the most out of the software
Links

Here you will find the most comprehensive collection of Revit, BIM, CAD and AEC links on the internet. I personally review each submission and produce a respective summary of the linked site .
Forums

A great place to discuss any aspect of Revit. We have home for every flavour of Revit – Architecture, Structure and MEP. We cover 3D modeling, detailing, plug-ins, Worksharing and lots more. The forum community is both friendly and extremely helpful. We have some very talented Revit users- which can be seen from the submissions they make to the Gallery Forum. If you have a specific Revit query you would like help with or just want to improve your Revit knowledge generally, our Forums are there for you. Registration is very easy and you can be making your first post within minutes.
Feedback
Revit.biz is all about learning. It’s about debate and discussion. It’s also about feedback. I love feedback because I can use it to better steer the site’s development to people’s needs. So if you have anything at all to say about the site (good or bad), please let me know. You can use either the Contact Form or the Suggestions and Feedback Forum.
And finally! I must stress that revit.biz is in no way officially linked to or affiliated with Autodesk Inc. The terms Autodesk, AutoCAD, Revit, Ecotect Analysis, Green Building Studio, and 3ds Max are registered trademarks or trademarks of Autodesk, Inc., and/or its subsidiaries and/or affiliates in the USA and/or other countries. All other brand names, product names, or trademarks belong to their respective holders.
Many thanks for your interest in revit.biz. I sincerely hope you find the information here both interesting and informative. I look forward to discussing Revit with you on our forums!
Kind regards,
Ian
Monday, March 1, 2010
The Revit Kid.com! by Jeffrey A. Pinheiro is licensed under a Creative Commons Attribution-NonCommercial-NoDerivs 3.0 Unported License. Based on a work at The Revit Kid.com.


