
With the release of SAuBIM Code Calculations v1.0, the great feedback, and summer finally arriving on the East Coast the SAuBIM team is offering SAuBIM Code Calculations v1.0 for 40% off!
This offer will end on June 30, 2011... so go check it out now!
That means that you can be automatically calculating occupancy loads and fixture counts for less than $14.00!!
Hurry over to the SAuBIM website and get it while it lasts!
 |
| presentation |
 |
| documentation |
 |
| creation |
 |
| automation |
 |
| bim after dark live |
Tuesday, May 31, 2011
Revit Tutorial - Window Elevations
Labels:
curtain wall elevations in Revit,
revit tutorial,
revit tutorials,
revit window elevations,
window elevations,
window families,
window family,
window legend
I posted a while ago about the hassles of creating curtain wall elevations... It seems every project I work on there is a dillema that arises about whether to use a built window family or a curtain wall (storefront) window in the model. The projects I work on all require window elevations because alot of them are aluminum or metal frame windows.
Well, here is a tutorial to show how simple it is to make window elevations of window families (as opposed to curtain walls/storefronts). The simplicity of this process is what makes me contemplate creating a window family for the curtain/storefront windows at a certain stage of the project (for those "storefront" built walls that only span 1 story).
Topics Covered:
Click here to see the video tutorial via Screencast.
Well, here is a tutorial to show how simple it is to make window elevations of window families (as opposed to curtain walls/storefronts). The simplicity of this process is what makes me contemplate creating a window family for the curtain/storefront windows at a certain stage of the project (for those "storefront" built walls that only span 1 story).
Topics Covered:
- Creating a Legend View
- Creating a Window Legend
- Creating a Window Elevation
Click here to see the video tutorial via Screencast.
Monday, May 30, 2011
Revit Tip - Hide Unreferenced Views
Labels:
revit tip,
revit tutorial
This is something so very simple yet easily forgotten.. I even forgot about it until someone recently reminded me. When printing to any printer (even PDF) follow these steps to make sure Revit does not print all those unreferenced sections, callouts, elevations, and detail bubbles.
- Click the Revit button and then click Print (Ctrl + P).
- Click the "Setup" button:
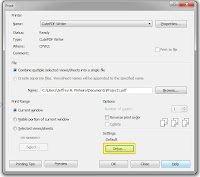
- Check the box that says "Hide Unreferenced View Tags"
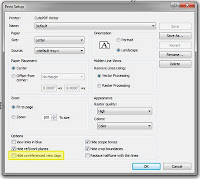
- Print


This is a nice little gem that can be easily looked over.
Tuesday, May 24, 2011
Project Vasari 2 - Released and Free!
Labels:
autodesk vasari,
project vasari
I apalogize for the lack of posting the past couple of days. I have a major deadline in work approaching... Thank goodness for Revit, BIM, and SAuBIM....
Well, if you have not heard already a new version of Vasari has been released. I have to say... It is awesome! Some very cool little features. David Light, who has shown some incredible skill with Vasari, has produced a great post with all the new features...
Well, if you have not heard already a new version of Vasari has been released. I have to say... It is awesome! Some very cool little features. David Light, who has shown some incredible skill with Vasari, has produced a great post with all the new features...
Tuesday, May 17, 2011
SAuBIM - Code Calculations for Revit - Tips
Luke wrote a very nice post about SAuBIM - Code Calcs for Revit v1.0 (which I posted about yesterday). He added some great tips that I added to the SAuBIM Page...
Click here to check out his Review/Tips of SAuBIM Code Calcs...
Thanks for all your input and emails Luke!
Steve Stafford, over at RevitOpEd also wrote a little dialogue about the program...
Click here to check out his Review/Tips of SAuBIM Code Calcs...
Thanks for all your input and emails Luke!
Steve Stafford, over at RevitOpEd also wrote a little dialogue about the program...
Monday, May 16, 2011
SAuBIM - Code Calculations for Revit Architecture (v1.0)
Labels:
revit code calculations,
saubim,
saubim code calcs
**Update** - Version 2.0 has been released for Revit 2013 and 2014!!! ***
Finally! I posted a while ago about a project I had been working on... Well, it is done! As I sat in the office one day updating occupancy plans I decided to call up a good buddy of mine (to help with the coding) and we created SAuBIM - Code Calcs v1.0!
There is a major link that has not existed, and still does not exist, in Autodesk® Revit® Architecture. This link is the ability to display calculated data from a schedule into a Tag or Symbol on your floor plans. Well, SAuBIM takes care of this for you when it comes to Occupancy Tags on Code Compliance floor plans.
Go to the SAuBIM website and look at all the videos! We feel that the software will be very valuable. In fact, we ran a few beta testing case studies with some of my readers and found that on a 30,000 Square Foot school it took an average of 3 hours for the test subjects to simply calculate the occupancy loads and fixture counts. It only took me 5 minutes to calculate plumbing fixtures, occupancy loads, and even add the occupancy tags to the floor plans using SAuBIM (with an 8% margin of error between my numbers and the beta tester's numbers).
The software only costs $22.99 $19.95 per user and you can buy it now!
About SAuBIM - Code Calcs v1.0:
SAuBIM – Code Calcs v1.0 for Autodesk® Revit® Architecture is a compact, easy to use, and time saving program. Autodesk® Revit® Architecture is a BIM (Building Information Modeling) program and can be very powerful when pulling the right information in and out. SAuBIM – Code Calcs v1.0 takes advantage of the information in your BIM model and saves you hours of time.
What does it do?
SAuBIM – Code Calcs v1.0 streamlines two very tedious processes when completing a building model: building code calculations and floor plans.
SAuBIM will create the required schedules to automatically calculate the following items:
· Occupancy Loads (Per Room)
· Required Male Water Closets
· Required Female Water Closets
· Required Lavatories
· Required Drinking Fountains
Once the schedules are loaded into your Revit® template or model all the work is done for you. Simply build your model, make sure your rooms are set to the correct Use Groups (Use Groups and integers are editable), create your Code Compliance plans with the proper room tags, and SAuBIM will take care of the rest.
What is included?
Once you purchase and install SAuBIM – Code Calcs v1.0 follow the Using SAuBIM video and you will have get:
- Occupancy Schedule that Calculates:
§ Occupancy Loads (Per Room)
§ Required Male Water Closets
§ Required Female Water Closets
§ Required Lavatories
§ Required Drinking Fountains
- Occupancy Load Tag – Will be automatically filled in on floor plans
- Plumbing Fixture Schedule
- Editable Use Group Key Schedule
**Update** - Version 2.0 has been released for Revit 2013 and 2014!!! ***
Sunday, May 15, 2011
High Definition Revit Renderings (HDR Tone and Merge)
Want to know a very easy way to add some serious depth, quality, and interest to your Revit renderings? I have been fooling around with this little technique and Revit renderings for quite a bit:
The left image is exported directly from Revit. The right image is exported from Revit and then enhanced using Photoshop. The tool is called HDR Toning and HDR Merge. HDR Toning only exists in Photoshop CS5 while HDR Merge exists in CS3, CS4, and CS5. I said "High Definition" in the post title but it really stands for High Dynamic Range. This is a fantastic way to add a lot of dimension to Revit Renderings.
There are tons of videos and tutorials on using these tools if you do a search but I have linked a few ones I have used below.
Merge to HDR
One of the great things about Revit Renderings is the ability to change exposure values and similar values after completing the rendering. So, go finish your rendering... save a few images with different exposure values and watch this video...
Tell me thats not a cool and simple way to get some awesome images...
HDR Toning
Now, in photoshop CS5 we have a fantastic tool called HDR Toning. With just one image you can get basically the same effect as the HDR merge with multiple exposure values (the rendering I posted above was done using the HDR Toning tool not the Merge). Check it out:
Pretty cool, huh? What do you guys think? I used this tool on a few of the interior renderings of my Mantra Hotel project (but I did not go to overboard... I was a little timid with it). Also, the tutorials I chose to show above were just the ones I used when I was looking into the tool.... Feel free to search around. There are thousands!
Friday, May 6, 2011
Revit Tip - EQ Dimensions Not Showing "EQ"
Labels:
dimensions,
EQ dimension,
EQ Revit,
revit dimensions,
Revit EQ,
revit tip,
revit tutorial,
the revit kid on twitter
I received an email from a reader stating that he had a string of dimensions and hit the "EQ" button on top of the dimensions to make them all Equal.

He could not understand why his dimensions were still reading the value and not showing "EQ" in the view. Well, it is very simple actually.


He could not understand why his dimensions were still reading the value and not showing "EQ" in the view. Well, it is very simple actually.
- Select the dimension string
- Go to the Properties window and there is an area called "Equality Display"

- Set this pull down to "EQ" and there you go!

Wednesday, May 4, 2011
The Revit Kid Project - Mantra Hotel
Labels:
design 5,
mantra hotel,
revit hotel,
revit kid project,
revit presentation,
university of hartford


First, click here to see the entire slide show on slideshare... (Note: There are some fade transition effects in the real Powerpoint that add a nice touch to it... you can't see these on slideshare...)
I also created a Photobucket album so you can see the original resolution images...
Comments and questions are welcomed!!!
Tuesday, May 3, 2011
Revit Tip : Revit 2012 – position the type selector
This took me quite a while to figure out on my own... Thankfully, for you, David wrote this post...
Revit 2012 – position the type selector
One of the nice features when Autodesk switched to to the Ribbon interface with Revit 2010 was the ability to have the Type Selector positioned in the Ribbon. Whilst, I would agree it took up valuable screen real estate, it was useful to have instant access to to all the Types of a particular element, such as all Wall Types, when accessing the Modify Tool. With Revit 2011, the type selector within the Ribbon was stolen from us, as it migrated its way to the Properties Palette. Whilst this was probably a good move in the long run, what if you wanted access to choose a new Wall Type and yet you didn't have the Properties Palette open? No Properties Palette, no Type selector!Therefore with Revit 2012, the type selector in the ribbon is back! So how do you position the Type selector back into the Ribbon? Start by opening up the Properties Palette. (PP – keyboard shortcut)

Next right mouse click over the type selector in the Properties Palette.

A drop down menu will appear, where you can choose to either add the Type Selector to the Quick Access Tool Bar (QAT) or add to the Ribbon Modify Tab.
Choose Add to Ribbon Modify Tab.

Click here to see the rest of the post...
Subscribe to:
Posts (Atom)

The Revit Kid.com! by Jeffrey A. Pinheiro is licensed under a Creative Commons Attribution-NonCommercial-NoDerivs 3.0 Unported License. Based on a work at The Revit Kid.com.