
 |
| presentation |
 |
| documentation |
 |
| creation |
 |
| automation |
 |
| bim after dark live |
Showing posts with label the revit clinic. Show all posts
Showing posts with label the revit clinic. Show all posts
Wednesday, November 16, 2011
Autodesk Cloud Rendering Hotfix
How convenient that a Hotfix for Cloud Rendering is released while all this discussion about the future of cloud rendering takes place... Cool.
Tuesday, May 18, 2010
Revit Tutorial - Solar Radiation Technology (Revit Clinic)
I have been waiting for this tool for a while and some documentation/information about it... It has been within Ecotect for a long time but now you can use it directly inside Revit. Thanks to The Revit Clinic for the post.
By default, the solar radiation add-in will create an analysis display style calledSolar Radiation Default. You can access the menu under the view Properties >Analysis Display Style. Once in the menu there are 3 tabs to modify the display style settings or create a new style; Settings, Color & Legend.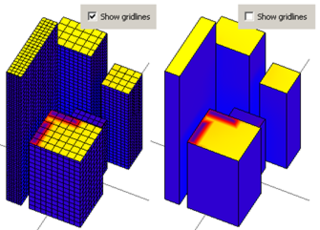
Creating an Analysis Display Style in Revit 2011
Using the recently released Solar Radiation Technology Preview, we can create or modify an analysis display style. Additional documentation is also available in the video here.
By default, the solar radiation add-in will create an analysis display style calledSolar Radiation Default. You can access the menu under the view Properties >Analysis Display Style. Once in the menu there are 3 tabs to modify the display style settings or create a new style; Settings, Color & Legend.
Let’s look at the Settings tab first:
The only option here is if you would like to see or hide gridlines in the analysis view:
Monday, March 8, 2010
Tutorial/Tip - Render Images Missing
Great little tip that parallels my Custom Material Tutorial, from The Revit Clinic:
The following render appearance images are missing
Common scenario when rendering is to have some materials use custom image files. I have included the 3 most common areas to check should you receive the “The following render appearance images are missing:” warning when rendering below:
1. As a best practice try to store all custom image files in one location. Wherever these image files are located, ensure that the path is specified under Options > Rendering > Additional Render Appearance Paths.
Add the path[s] where the images are stored here, and then re-render the scene to see if the warning persists.
2. If the materials are stored on a network location, verify the location appears in the list above as an additional render appearance path. Also make sure all users have access to this folder.
3. Depending on the application which created or saved the image file the material uses, Revit may not be able to load the image file for rendering. In most cases this may occur with certain JPEG compression modes and will generate the same warning message at render.
One easy test is to open the image file and save it as .PNG format instead. Edit the Revit material to point to the .PNG format image to see if this eliminates the warning when rendering.
Monday, February 8, 2010
Tutorial - Splines and Forms (Revit Clinic)
Labels:
creating forms,
forms,
revit tutorial,
splines,
the revit clinic
More great stuff from The Revit Clinic:
Splines & Creating Forms
By default you cannot create a single closed loop with one spline created in Revit. I’ve included a few possible scenarios and what may be occurring below:
Single Spline
This will create one spline which cannot be connected to the origin point. You would need to create a second spline and snap to the origin and end point to fully close the spline. If a form is created while open it will be a surface, if closed it will be a solid:
Video Example
3D Spline by 3D Points
The second option for creating a spline will allow you to get closer to a closed spline in one pass. However if you snap back to the origin reference point it will create 2 overlapping points which will result in the create form failing.
Continue to the rest of the post and more videos....
Thursday, February 4, 2010
Room Names - Copy, Paste, Maintain (Revit Clinic)
Labels:
revit tutorial,
the revit clinic
Another useful tutorial from The Revit Clinic:
2. Create > Create Group.
3. With the group selected Cut, then Paste the group as needed.
4. After the group is pasted, select the group > Ungroup.
Prevent Room Numbers From Changing When Cut & Pasted
By default when you cut and paste rooms to the same place or another view the room numbers will shift to the next available numbers.
If you need to maintain the original room numbers, the following workflow will do so:
1. Select everything in the view > Filter > select Rooms.2. Create > Create Group.
3. With the group selected Cut, then Paste the group as needed.
4. After the group is pasted, select the group > Ungroup.
The room numbers will be maintained, and afterward the group instance can be deleted from the Project Browser > Groups > Model.
Monday, August 17, 2009
10 Wall Tips..
Labels:
10 wall tips,
the revit clinic
The Revit Clinic continues their 10 Quick Tips...
1. Embed a wall into curtain panel
You can change a curtain wall panel to any wall type by un-pinning it and modifying the type. Next you can then embed another curtain wall into the new wall panel infill by adding a curtain wall and using the Cut Geometry tool between the wall infill and curtain wall. You can repeat this process as many times as needed.
2. Disallow join
When you right-click over any wall end you activate the Disallow Join option. This will prevent the wall end from joining with other walls.
3. Unlock wall layers
When editing the structure of a wall, you can click Modify and un-lock a region of a wall layer. Afterwards the wall will display an additional grip to dynamically adjust the wall layer as needed.
This dimension can also be manually entered in the Instance Properties of the wall under Base Extension Distance or Top Extension Distance depending where the layer was unlocked.
Thanks to The Revit Clinic Team for posting these helpful tips. You have inspired me to start creating some new tutorials now that things in my personal life are calming down. Be ready for a barrage of what seem to be very loved video tutorials.
Wednesday, June 17, 2009
Tutorial - Roof Dome - Conceptual Massing
Labels:
revit 2010,
revit clinic,
revit tutorial,
the revit clinic

Cool tutorial over at Revit Clinic with a great video.
I want to go through an approach for creating a domed conceptual mass in Revit 2010, with parameters attached for height and width.
Subscribe to:
Comments (Atom)

The Revit Kid.com! by Jeffrey A. Pinheiro is licensed under a Creative Commons Attribution-NonCommercial-NoDerivs 3.0 Unported License. Based on a work at The Revit Kid.com.