If you have a Mac or Macbook Pro and you are running Revit through Bootcamp I bet you're pulling your hair out calling Autodesk and registering every time you boot up Windows.
I have been using my Macbook Pro with Bootcamp and Revit for over a year and I must say I am very happy with it. The performance is great and you get the best of both worlds! The only downfall has always been the Registry Key bug that would kick Revits license ALL the time. I am talking every single time I opened Revit I would have to make a call to Autodesk.
I recently found a blog posting Autodesk-Revit.bogspot.com that linked to a registry fix released by Autodesk. I installed it the other day and so far so good... haven't had to hit #6 on my speed dail (yes, Autodesk is now on my speed dial).
I am proud to introduce you to the very first installment of, "The Student to Student Guide to Revit". Our first project is a house from start to finish.
A buddy of mine has been telling me he would like to see more basic tutorials on the blog. This spawned the idea of creating a series of tutorials. What better way to learn Revit than to see a house being created from start to finish?
The house I am using is a house I designed in a design studio BEFORE I knew Revit. We will call the house "Harbor House". I have developed a lesson plan for each step of the building process. Stay tuned and enjoy!
I recieved a few emails after the last tutorial, wall sweeps. The emails were about the macros I used during it. I decided to compile a list of the macros I tend to use every time I am on Revit. There are a lot of macros in Revit, but these are basics that I feel I am always using:
RP - Reference Plane MM - Mirror MV - Move CO - Copy VG - Visibility/Graphics AR - Array L - Line (Model Lines, not Drafted!) RE - Resize VP - View Properties
UN - Project Units
There are a whole lot more. I just thought I would share the ones I use every single day without any thought. Unlike CAD, all you must do is type the two letters and Revit will activate the Macro. No need for a space bar or enter.
This next tutorial is a good introduction to using parameters in Revit. Parametric design is a major advantage to using Revit and essential to becoming an efficient and great Revit user. I thought a great way to introduce parameters is to create a parametric profile. Check out the video below:
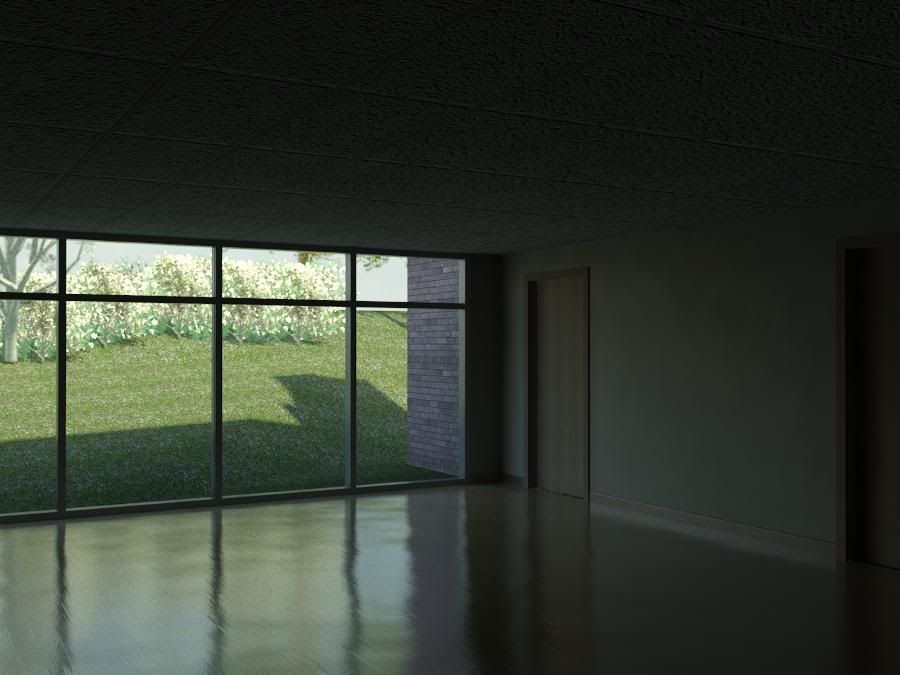
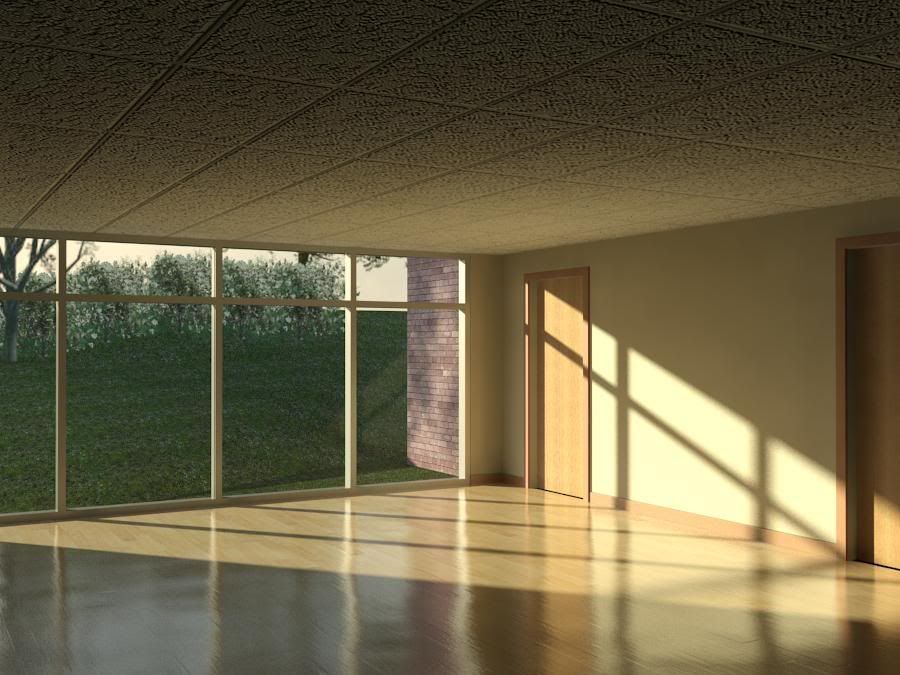
I received an email from a man named Greg (thanks for the question!) who asked a question about my renderings on this blog. He asked about how I managed to get the sun light to look so bright and hit the building perfectly.
There are lots and lots of factors that effect the way a rendering will turn out, but there is one that always seems to be the most common factor, the placement of the sun. This may seem simply and silly, but when you have no artificial lighting it is very important. I made a new tutorial for Greg and everyone else to see.
If you searched Google looking for the best computer hardware to use with Revit and did not find very much information you are not alone. Most of the information I find is from a few years ago and definitely does not apply now.
The computers at my school crash if I open a Revit file any larger than 30mb. I can almost guarantee there are many students out there who's computers are being crippled by Revit and this could be a reason to not convert to the BIM world.
I personally am running Revit on a Macbook Pro with Bootcamp 2.1 with the following specs:
- Windows Vista Home Premium 64bit
- 2.4 ghz Dual Core Processor
- 4 gigs of Ram
- 256mb Nvidia Geforce 8600m
I would have to say Revit runs reasonably well... but there are moments in big files where that good old loading bar never seems to stop loading.
In work I am using:
- Windows XP 32bit
- 3.0 ghz Phenom Quad Core
- 4 gigs of Ram
-512 Nvidia Geforce 8800gt
There is a considerable difference between my laptop and my desktop but the desktop still has its moments and feels a bit laggy when the file gets very large (over 50mb) or a model gets very complex.
I would like to open up the comments section to those of you using Revit what your specs are and how the performance is. Ultimately, reaching a conclusion of the best Revit machine.
In my experience I found that the smooth workflow of Revit can be easily slowed down the further into a project I get. A main reason for this slow of work flow is searching through the growing list of families in a project.
A simple solution for organizing your familes is to use a two or three letter initial before every family, wall, material, etc...
For example, if your name or company is Jon Robert Macintosh: Instead of: Foundation - 8" Concrete Wall Use:JRM - Foundation - 8" Concrete Wall
Do not be afraid to use alot of detail in the names as well. This is not DOS anymore or Windows 98... we can use much more detailed descriptions. For example:
Instead of: Basic Wall - Interior - Metal Stud 4.875"
Use: JRM - Interior - 3 5/8" Metal Stud w/5/8" Gyp. Each Side (4 7/8")
If your project has a wall schedule with wall types use:
JRM - Type 1 - Interior - 3 5/8" Metal Stud w/5/8" Gyp. Each Side (4 7/8")
This may seem like such a stupid little tip but I assure you it helps. Once you rename or name every new family, wall, and material using the format I provide you will have a much more pleasurable time working and managing your Revit file.
Revit is not only powerful for it's ability to use a single 3D model as a set of construction documents. Revit's data-base style is an efficient and powerful tool for managing those typical details you may use in class or at a firm.
In this tutorial I run through the basic idea of a drafted view and the power of Revit when it comes to calling out details, sections and elevations. Now, you will not have to redraw that typical wall section for three semesters and manage where it is called out.
You've got a set of CAD details you imported into Revit from a manufacturer. After you've imported and changed the line work of ten or so details you realize something... It's not in all capitol letters! Or... It's in all capitol letters! How do you fix this without retyping all the text to your liking?
Well, if you are a CAD user you're thinking, "Easy! Just highlight and right click... and change case!". Sadly, thats not true in Revit. But thanks to Avatech Solutions it is that easy. Avatech has a suite of utilities completely free for your use with Revit.
Here is a quick little tutorial about how to organize your sheets in Revit. This has made my files in work much easier to work on and easier for others who use the file in the future to navigate through the sheets.
I have also updated the two tutorials previously posted with the new software. They should be much easier to see and understand. Scroll down or see the direct links to the right.
Last semester I sat in on a judging panel for a design class. Out of all of my fellow students presenting only three used Revit. There was one student, who's project was very nice, answered a question by an Architect on the panel. The dialogue went as follows:
Architect: "What is that in the bedroom wall?"
Student:"Oh... that is a sliding door."
Architect: "Why is it shown so graphically wrong?"
Student:"It's the program."
This aggravated me. So here is a quick tutorial on how to make a windows/door look graphically correct in plan. This is especially helpful if you end up creating a window or grabbing one from a manufacturer.
What does this have to do with Revit? Well Frank Gehry's software is very much like Revit. Hmmm..... So all you students who see Bilbao and marvel.... BIM made it possible.
Also, this is a link to Gehry Technologies... Which absolutely fascinates me.
I handed in a project I did in Revit for a Structures class and received a few questions about it. Using this project as an example I would like to address one question I was asked by a few people:
"How did you model every single CMU block and the bond beam?!"
Well the answer is simple... I didn't. Click the link below to view the tip/tutorial.
I would like to thank Greg at Revit3D.com for giving a wonderful post today! It is so much more than I could have asked for! If you read the post you would know he helped me out greatly last year and I thank him... I visit his site every day and you should too. I am going to try my best to live up to his expectations!
Coming soon I will be posting my first tutorial/tip... Stay posted.
Many teachers are not preaching with the BIM choir. Most of the teachers are still stuck in the flat world of AutoCAD. This makes us students use AutoCAD, especially when in a design studio. With the comfort and basic knowledge about how to draw a line with a mouse and the encouragement of professors most kids will stick with CAD. Without getting into the professional benefits of Revit, I want to point out a few advantages Revit will give the students using it:
Visualization
I am sure every student has gone through this process in the design studio. The process of having a great concept and sketching it out. Then you start drafting a beautiful 2D plan on AutoCAD. You are halfway through the semester and you begin to bring down lines for an elevation. You have your floor plan rotated and spun all over model space for all the guide lines. Your elevation begins to form on the screen. It's HIDEOUS! Nothing like what you had in your head. The professor finally gets a glimpse at your screen and critiques the hell out of your newly formed elevation... Now your back to square one.
If you were using Revit this problem would have been avoided or caught much early. Using Revit changes the way you think about a project before and during the design/drafting process. When drawing a single wall in Revit you are forced to think about the consequence of that wall in plan, sections, elevations, and 3-dimensional views.
Parametric Design and Models
The absolute worst part of design studio is making changes. After hours upon hours of work on a beautiful floor plan in CAD you finally show it to the class/professor. Fifteen minutes later your back on CAD for another few hours changing the plans to match all of the critiquing you just dealt with. You also must change all of your sections and elevations as well.
With the use of parametric families and Revit these changes become a breeze. Moving a window a couple feet over is as simple as clicking and dragging it two feet over. Viola! Your sections elevations and details are all up to date as well!
3D Model and Realistic Renderings
This advantage is pretty self explanatory. Your professor will be ecstatic to see a photo-realistic rendering of your exact building (especially after seeing one to many Sketchup and Playstation 1 graphic's AutoCAD renderings). The best part is... your making the 3D model as you create your plans, elevations, and sections.
Those are just a few of the many advantages that students will gain while using Revit in a design studio environment.
This video is the reason I decided to use Revit for the first time and I wanted to share it:
Hello and welcome to The Revit Kid.com! My name is Jeff and I will be the main blogger for this here blog. I am a student who experienced the amazing capabilities and advantages of Revit Architecture while forcing my self to learn it during my last design course. While sitting in class the other day I had a conversation with a few students currently enrolled in the architecture program at my school. These students were taking a Revit class. Their eyes glazed over as I showed them the work I have done in Revit and the questions began to flow out of them. This is when I realized that it might be very helpful to any students wanting to learn Revit to learn it from a fellow student.
I would like this blog to contain tutorials done by others and myself. I would also like it to be an archive of the many questions I have received by students about Revit Architecture and the like. Finally, I would like it to encourage the use of Revit in the classroom as not only a tool but a tool that will create a smart and usable building information model.
My experience is as follows:
- 8 years in the field of Architecture
- 8 years of AutoCAD experience
- 5 years of Revit (I am currently employed at an ALL Revit firm)
- Associate's Degree in Architectural Engineering Technology
- Associate's Degree in Construction Management/Technology
- Bachelor's Degree in Architecture
- Master's Degree in Architecture
For up to date tips, tricks, products, and solutions of all things Revit and BIM straight to your inbox fill out the form below:
Lastly, I would like to offer my tutoring services to any student who would like a more in depth and personal lesson in any version of Revit. For now, this service is limited to Connecticut. Please email me for info at:


